


Profiles
LCA - the art of lead is not dead!
 At the LCA they never cease to be amazed at the skills and creative ingenuity of their members. Those that consider leadworkers as 'just another roofing trade' should look closely at the photographs below and perhaps think again.
Water features in lead are not that unusual with various styles of fountain head decorated by cast cherubs, birds, fish, etc often featuring in the bespoke catalogues of those that focus on the more decorative side of the craft.
However the sheer scale of the chalices tackled by Brian Turner of Turner’s Ornamental Leadwork was in itself hugely impressive and when considering the finished item in the final photographs shown here, one can only wonder “how on Earth did he do that?”
The requirement from the client was for two lead chalices each made of an internal and external bowl, shaped and then lead welded together to form a water feature at his large country house.
Straightforward enough perhaps, until you look at a few dimensions:
Finished diameter - 1.5M (starting from a diameter of 1.7M)
Thickness - 50mm (centre) tapering to 10mm at the edge
Weight - 905 kgs (the second chalice was ‘only’ 825kgs)
Finish - Planish (hammered effect)
To address the handling logistics Brian first built his own turntable from steel and plywood.
The basic pattern shape was a 1400mm diameter panel with two cords cut off to allow for sand casting. The centrepiece casting was a plate 300mm diameter, 50mm thick, with further plates of 25mm and 10mm then welded around the circumference.
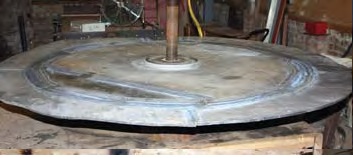
The two cord sections were then sand cast and lead welded into place. Brian then sand cast further plates in curved section 150mm wide by 10mm thick which he welded to the outside circumference of the centre plate to form a complete circle of solid lead 1.7M in diameter.
Using firstly a large rubber mallet and then specially adapted metal club hammers to boss the lead (unusually) inwards.

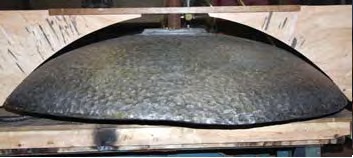

Brian worked the lead from the outer edge towards the centre, at the same time shaping the circle downwards to form the outer inverted bowl of the chalice. Having shaped the outer bowl and introduced the required hammered effect (planish) finish.
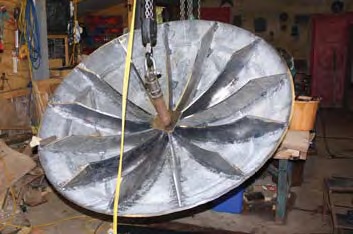
The next step was to weld 12 supporting ribs made from 10mm cast sheet to the inside of the outer bowl.
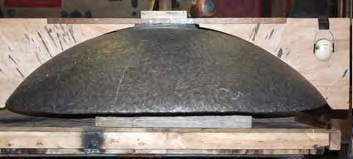
After finishing the outer bowl, Brian then set about the inner bowl in exactly the same fashion.
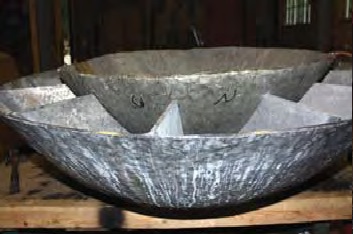
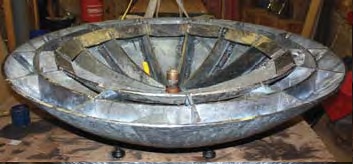
The inner bowl was then set onto the supporting ribs of the outer bowl, with great care needed to check that the bowls were level.
Next was putting the hammered effect finish to the pieces to be welded together to form the circular shelf section. These were then tacked onto the supporting ribs and then welded inside the circumference of the outer bowl and to the outside circumference of the inner bowl.
Having completed the first chalice, Brian then started all over again for the second chalice.
The bossing work to shape the inner and outer bowls took a total of FOUR DAYS for each of the chalices and Brian used a gas burner underneath continuously throughout the process to assist in the workability of the lead.
The finished effect is a stunning tribute to the skills of a dedicated craftsman. However, those that might casually admire the finished result in situ would have no concept of the sublime craft work and sheer physical effort required to create this work of art.
Would anyone ask themselves “How on Earth did he do that?” Find out more by emailing Brian at This email address is being protected from spambots. You need JavaScript enabled to view it.
VISIT OUR ASSOCIATED SITES
![]()
![]()
![]()